update: 2011/03/02
工具列:提供兩種相簿輸入方式 1.直接貼上相簿相關網址 2.手動指定網站類型,在網址列輸入帳號。
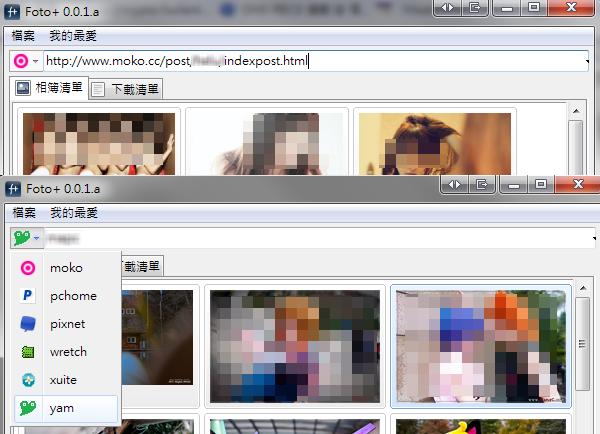
相簿瀏覽:還沒決定要採固定大小正方形或是照原比例大小顯示縮圖

$tree state define HOVER
$tree state define OPENW
$tree state define OPENE
$tree column create -tag cIcon
$tree column create -tag cName -expand 1
$tree element create elemIcon image -image [$ibox get favicon-wretch]
$tree element create elemName text -justify left
$tree gradient create grdHover -steps 4 -stops {{0.0 white} {1.0 #ebf3fd}} -orient vertical
$tree element create elemRect rect -fill [list grdHover HOVER]
$tree element create elemRectOutline rect -rx 1 -outline [list #b8d6fb HOVER] \
-open [list w OPENW e OPENE] -outlinewidth 1
$tree element create elemBorder rect -outline "#e2e3e3" -open nws -outlinewidth 1
$tree element create elemBorderS rect -outline "#ffffff" -open nws -outlinewidth 1
# column icon
set sty [$tree style create styIcon -orient horizontal]
$tree style elements $sty {elemRect elemBorder elemBorderS elemRectOutline elemIcon}
$tree style layout $sty elemRect -detach 1 -padx {2 0} -iexpand xy
$tree style layout $sty elemRectOutline -detach 1 -iexpand xy
$tree style layout $sty elemBorder -detach 1 -iexpand y -padx {27 0}
$tree style layout $sty elemBorderS -detach 1 -iexpand y -padx {28 0}
$tree style layout $sty elemIcon -padx {6 2} -pady {2 3} -iexpand ns
# column name
set sty [$tree style create styName]
$tree style elements $sty {elemRect elemRectOutline elemName}
$tree style layout $sty elemRect -detach yes -padx 0 -iexpand xy
$tree style layout $sty elemRectOutline -detach yes -iexpand xy
$tree style layout $sty elemName -padx 6 -pady {2 3} -squeeze x -expand ns
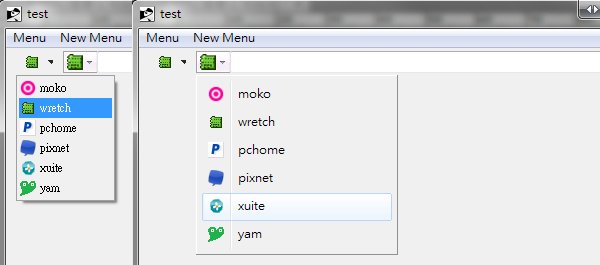
set nsList [list moko wretch pchome pixnet xuite yam]
foreach i $nsList {
set item [$tree item create -parent 0]
$tree item style set $item 0 styIcon 1 styName
$tree item element configure $item 0 elemIcon -image [$ibox get favicon-$i]
$tree item element configure $item 1 elemName -text $i
}
$tree item state forcolumn all 0 "OPENE"
$tree item state forcolumn all 1 "OPENW"
目前還遇到一個難題,就是沒有辦法做出 menu 陰影效果。
Firefox 關於網址的記錄都存放在 places.sqlite 中,此檔案為 sqlite3 資料庫,檔案位置
Linux
/home/<user>/.mozilla/firefox/<profile>/
Win XP
C:\Documents and Settings\<user>\Application Data\Mozilla\Firefox\Profiles\<profile>\
Vista / Win7
C:\Users\<user>\AppData\Roaming\Mozilla\Firefox\Profiles\<profile>\
其中的 <profile> 格式為 "亂數.default",例如 dhyt3gd2.default,Schema 參考 The Places database。
以下範例是讀出書籤中 wretch 與 xuite 網址,將使用者 id 與網站類型語名稱存入 array 。(註: 當 Firefox 正在執行時會 lock db,須先將其複製到 temp 後再存取)package require sqlite3
set dirList [glob -directory [file join $::env(home) AppData/Roaming/Mozilla/Firefox/Profiles] -type d *]
foreach dir $dirList {
set fBookmark [file join $dir places.sqlite]
if { [file exists $fBookmark] == 0 } { unset fBookmark }
}
if [info exists fBookmark] {
set fDb [file join $::env(home) .wget bookmarkFF.db]
file copy -force $fBookmark $fDb
array set bookmarkList ""
db eval {SELECT url, moz_bookmarks.title FROM moz_places, moz_bookmarks \
WHERE moz_places.id = moz_bookmarks.fk and \
(url like '%www.wretch.cc%' or url like '%xuite.net%')} result {
regexp {http://([\w.]+)} $result(url) -> host
foreach t {wretch xuite} {
if {[string first $t $host] != -1} {
set type $t
break
}
}
set uid ""
switch $type {
wretch {
regexp {http://[\w.]+/[\w]+/([\w]+)} $result(url) -> uid
}
xuite {
regexp {http://[\w.]+/([\w.]+)} $result(url) -> uid
}
set bookmarkList($type,[string tolower $uid]) $result(title)
}
}
}
db close
$(document).ready(function(){
//載入圖片 01~20.png
var photoCnt = 20;
var img = "";
for (var i = 1; i <= photoCnt; i++){
img = (i<=9)?' ':'
':' ';
$('#slide-photo').append(img);
}
$('#slide-photo img:first').show().addClass("active first");
$('#slide-photo img:last').addClass("last");
//開始播放
var ival = setInterval(function() {
var active = $('#slide-photo img.active');
var next = (active.hasClass("last"))?$('#slide-photo img:first'):active.next();
active.fadeOut(500,function(){
active.removeClass('active');
next.addClass('active').fadeIn(500);
});
}, 3000);
});
';
$('#slide-photo').append(img);
}
$('#slide-photo img:first').show().addClass("active first");
$('#slide-photo img:last').addClass("last");
//開始播放
var ival = setInterval(function() {
var active = $('#slide-photo img.active');
var next = (active.hasClass("last"))?$('#slide-photo img:first'):active.next();
active.fadeOut(500,function(){
active.removeClass('active');
next.addClass('active').fadeIn(500);
});
}, 3000);
});
css#slide-photo {background-color: #0abab5;}
#slide-photo img {width: 445px; background-color: #0abab5; display: none;}
因為美編交給我的網頁中輪播的圖片不能用絕對定位 (position:absolute),所以在這個範例必須要淡出後隱藏才能顯示下一張再淡入,比較漂亮的做法是用絕對定位,要淡出的 z-index 降低,要淡入的 z-index 增加。
wm overrideredirect . 1
wm geometry . [winfo screenwidth .]x[winfo screenheight .]+0+0
wm attributes . -topmost 1
方法二 (Tk 8.5)
wm attributes . -fullscreen 1 -topmost 1最近寫的一個程式要透過 optcl 抓 ie 來全螢幕顯示網頁,進入全螢幕時隱藏 toolbar,跳離全螢幕後顯示 toolbar。因為在全螢幕下 tk 沒辦法抓到 ie 的 event,所以設計成全螢幕時將 toolbar 高度改為1,然後在上面 bind event。以下是簡單的範例,按下放大視窗按鈕會全螢幕,在最底下滑鼠左鍵點兩下會跳離全螢幕。(註: 因 wm protocol 中沒有視窗放大的 protocol,這裡採用 bind Configure event 並判斷視窗目前狀態是否為 zoomed 來偵測按下視窗放大按鈕的動作。)
package require optcl

optcl::new -window .fmeBrowser "http://www.google.com"
frame .fmeSub -bd 0 -relief groove -height 1
pack .fmeBrowser -fill both -expand 1
pack .fmeSub -fill x

bind .fmeSub <Double-1> {
  wm state . normal
}

bind . <Configure> {
  if { "%W" eq [winfo toplevel "%W"] &&  [wm state . ] eq "zoomed"} {
    wm attributes . -fullscreen 1 -topmost 1
  } else {
    wm attributes . -fullscreen 0 -topmost 0
  }
}
如果要塞滿多顆螢幕的時候會發現用方法二只能在一顆螢幕上全螢幕顯示,此時得先抓出全部的長寬再用 wm geometry 設定。以下是用 twapi 取得各螢幕的位置後再拿最右和最下的值當作長寬,如果事先已知道執行時螢幕的總長寬也可以寫成變數比較簡單。package require twapi
foreach display [::twapi::get_multiple_display_monitor_info] {
lappend listx [lindex [lindex $display 1] 2]
lappend listy [lindex [lindex $display 1] 3]
}
wm overrideredirect . 1
wm geometry . [lindex [lsort $listx] end]x[lindex [lsort $listy] end]+0+0
wm attributes . -topmost 1
$(document).ready(function(){
    $('input[type="text"]').taigiInput();
    $('textarea').taigiInput();
});
html